
A digital personal community (VPN) is significant to serving to you keep safe on-line, which is particularly useful on this trendy period of smartphones.
A VPN encrypts all community visitors to and out of your system because it funnels that info via an exterior server. It additionally hides your distinctive residence web protocol (IP) tackle from all prying eyes, permitting you to remain incognito.
Not even your web service supplier (ISP) can inform what websites you go to, solely that you simply’re utilizing a VPN. VPNs may even bypass blocked web sites and assist you to watch content material from different international locations simply.
ANDROIDPOLICE VIDEO OF THE DAY
Sadly, not all VPN suppliers might be trusted, as some hold logs of your total on-line looking historical past. They will then take that knowledge and promote it to varied third-party firms, resulting in annoying focused commercials and even spam.
A couple of VPN suppliers might initially have dangerous intentions. Nonetheless, on the identical time, sure international locations pressure them to maintain tabs on what their customers are doing.
This can be a important problem for the reason that most important promoting level of a VPN is to encrypt your community visitors and conceal your precise IP tackle from the general public.
A number of reliable VPN suppliers can be found in the marketplace immediately. Nevertheless, internet hosting your individual VPN server can additional improve your on-line safety.
It allows you to management and encrypt your net visitors immediately, so you do not have to fret about third-party firms logging your looking historical past.
This selection will not be your best option for everybody, however it’s possible you’ll need to give it a shot in case you do not belief most third-party VPN suppliers.
This information discusses the important thing advantages and disadvantages of internet hosting your individual VPN whereas additionally explaining easy methods to set one up.
For this information, we arrange a distant Linode digital personal server (VPS) operating OpenVPN, which prices $5 per thirty days.
When you can host your individual VPN server from residence, you get better speeds with just about no downtime utilizing a remotely-hosted VPS.
You additionally haven’t got to fret about native {hardware} failures or system administration, simplifying the setup course of. And you do not want expertise with Linux or servers. Plus, you may select from a number of area choices, which is useful for a worldwide viewers.
Ought to I host my very own VPN server?
As you might need anticipated, making your individual VPN server has a number of benefits and drawbacks. Listed below are the details to recollect when deciding if you wish to undergo with internet hosting a server or not.
Benefits
- You are answerable for your knowledge.
- It is normally cheaper or on-par with paying for a VPN subscription.
- You need to use the VPN server for different issues, like internet hosting a web site or Nextcloud set up.
- Web sites and providers that ban VPNs will not doubtless detect your server as a result of it will not be on an IP block checklist. This does not apply to Android apps since they’ll see when a VPN or proxy is presently getting used.
Disadvantages
- Anonymity is not doable for the reason that VPS host has your identify and private fee info.
- Your whole bandwidth will likely be restricted. Linode provides you 1TB/month, however you successfully get 500GB as a result of the info goes from the origin to the VPN after which from the VPN to you.
- You will not get particular options that some VPN providers present, like malware and tracker blocking, except you might have the technical data to set them.
- You’ll be able to’t simply change between totally different international locations/places.
Arrange a Linode VPS
To kick off the preliminary strategy of establishing your individual VPN server, you will create a VPS. This acts because the Linux digital machine on which your VPN server will run.
There are a lot of VPS suppliers; nonetheless, Linode is a superb choice that is not too sophisticated. As such, that is the one we use for our information to maintain issues easy. DigitalOcean is one other fashionable choice we extremely advocate as an excellent various.
To start working with a Linode VPS, try the next steps:
- Go to Linode’s web site and create an account if you do not have one. (That is our referral hyperlink, which supplies us a small credit score while you be a part of.) You will have to enter your billing info earlier than you may proceed.
- Go to your dashboard, click on the Create button, and choose Linode. Or go on to this hyperlink. That is the place you will decide what {hardware} your server can have and the place it will likely be hosted.
- Within the Select a Distribution field, select the latest obtainable Ubuntu LTS launch, which is 21.04 LTS on the time of this writing.
- Select the area you need your VPN to be positioned in. If you wish to change the situation later, contact Linode help.
- For the plan, choose Nanode 1GB from the checklist of Shared CPU choices. VPNs do not require a lot processing energy to function, so this low-spec choice needs to be greater than appropriate for the duty.
- Enter a password within the Root Password field. Choose a safe and distinctive mixture to maintain your account protected and sound.
- Click on the Create button and look forward to the VPS to complete producing and booting.
- Now you might have a recent new server able to run a VPN on!
Log in to the VPS
Your server does not have a graphical person interface (GUI) like Home windows or macOS, so there isn’t any easy approach to work together with it visually.
It solely has a command line. Do not be scared; these steps are straightforward to comply with. Should you’ve ever used a terminal app on macOS, Linux, or Android, you will really feel proper at residence going via this course of.
To log into your new VPS, you may try these steps to get began with that:
- As soon as your VPS is open, click on the Launch LISH Console button within the upper-right nook of the display screen. This opens a web-based terminal, and also you’re prompted for a login.
- Sort root, press Enter, then sort your root password. You do not normally get any visible suggestions as you sort. That is fully regular right here.
- Press Enter as soon as extra to substantiate your selection.After you are logged in, you are greeted with a Welcome to Ubuntu message. You may discover this checklist of frequent instructions useful in case you’ve by no means used a Terminal on Linux or macOS earlier than. The subsequent half entails establishing the VPN server, so let’s get began!
Arrange the VPN
Now it is time to dive into the command line interface and begin establishing the VPN. Fortunately, that is the simplest step since we use the OpenVPN highway warrior set up script to get every thing operating. The script asks to your IP tackle, what protocol to make use of, and different information.
To get began, run this command within the console window (that is the letter O after VPN, not a zero):
wget https://git.io/vpn -O openvpn-install.sh && bash openvpn-install.sh
Then comply with these steps:
- Press Enter while you get to the protocol and DNS server.
- When requested for the port quantity, sort 443. Many networks block the default OpenVPN ports, so altering it to 443, which is used for HTTPS visitors, can stop some forms of blocks.
- Enter your identify when requested. The script installs the required software program and units every thing up.
As soon as the script is completed, it exports a .ovpn file within the /root/ folder. This file comprises your VPN’s connection and login information, which you will have to retrieve from the server. It is also advisable to maintain these credentials protected and safe by not sharing them with anybody else.
Obtain the login information
The best approach to switch the .ovpn file to your system is to quickly begin an internet server, permitting you to obtain it utilizing any net browser. When you end the obtain, cease the server and retailer the .ovpn file someplace protected.
To start out an internet server, run the next command:
python3 -m http.server 80
Then comply with these steps:
- After the server is operating, paste your server’s IP tackle to the suitable location. You will discover this on the Linode Abstract web page in your browser’s tackle bar. Guarantee it does not begin with https:// since your server will not have a safety certificates by default.
-
You will see a easy listing itemizing with just a few recordsdata so that you can select from. Click on the .ovpn file to obtain it.
If you wish to arrange a VPN in your smartphone, repeat the identical course of on that system. Alternatively, you may switch the .ovpn file out of your pc to your cellphone utilizing your most popular methodology.
- For max safety, we advocate an area offline answer, equivalent to a USB cable connection. You need to use cloud-based storage for extra comfort, nevertheless it’s a barely much less safe choice on this case.After downloading the file, shut down the server to maintain your knowledge protected from others. Press the CTRL and C keys in your keyboard concurrently to finish the server. You will see an exiting message. If that does not work, reboot your VPS from the Linode dashboard to cease the server.
The OVPN file permits anybody to hook up with your VPN server, so ensure that it does not fall into the fallacious fingers! Should you assume somebody is accessing your VPN who should not be, rerun the VPN setup command. This revokes the prevailing file permission and generates a brand new one on the spot. Then, solely you might have entry to the file, correctly.
Hook up with the VPN
Now that you have arrange your VPN and downloaded the connection file, you are able to strive it out. OpenVPN purchasers can be found for each main working system. This information solely covers easy methods to join utilizing an Android system or a Chromebook with entry to the Google Play Retailer. For Home windows, Mac, and iOS, VPNGate has a wonderful information right here.
There are just a few totally different OpenVPN purchasers for Android. We advocate OpenVPN for Android as a result of it really works nicely and is totally open supply. When you obtain it from the Google Play Retailer, faucet the Import button within the upper-right nook (the field with the downward-pointing arrow) and faucet the file location.
Then, find your .ovpn file. After finding the .ovpn file, faucet it to proceed, and press the Save button to substantiate your adjustments.
From the primary display screen, faucet the brand new entry, and also you’re linked to your customized VPN server. Chrome OS totally helps Android VPNs, so this app additionally works for Chromebooks. You will see a lock icon subsequent to the Wi-Fi indicator.
Safe the server
Since your VPN is an always-on server that receives and transmits private knowledge, there are some further issues to think about. It is best to take just a few extra steps to cut back doable server-side safety vulnerabilities. To boost the safety of your VPN, we’ve just a few ideas.
Allow automated updates
The very first thing to do is allow automated package deal updates, which permits your server to remain safe by itself. This additionally retains you from manually logging in sometimes to put in the updates, making your life so much simpler sooner or later.
First, run this command within the web-based terminal to put in any updates which can be obtainable to your server:
apt replace && apt improve -y
As soon as that is finished, run this command to put in the automated updater:
apt set up -y unattended-upgrades
Now you are all set! From right here, your server mechanically checks for and installs updates, with minimal (if any) downtime to your VPN. Should you get a message like unattended-upgrades is already the latest model, it was beforehand put in within the system picture supplied by Linode.
Flip off SSH entry
Should you aren’t utilizing your server for anything, disable distant entry through SSH. This prevents anybody, together with your self, from logging in to the server remotely. You’ll be able to solely register utilizing the console through the Linode dashboard, which additionally helps stop brute-force login assaults in your server.
First, run this command via the web-based terminal to disable the SSH server from beginning when the server boots up:
systemctl disable ssh.service
Then, cease the server that is presently energetic with this command:
systemctl cease ssh.service
Now that distant entry to your server has been fully disabled, it is solely accessible from the Linode console and nowhere else. If you wish to revert to the default settings at a later date, run the next instructions within the web-based terminal:
systemctl allow ssh.service
systemctl begin ssh.service
Arrange two-factor authentication
The ultimate step in securing your VPN server entails enabling two-factor authentication (2FA) to your Linode account. Doing so makes it harder for somebody to entry your server with out your permission.
To allow 2FA in your Linode account, try these steps:
- With the Linode dashboard open, click on your profile icon within the upper-right nook, then choose Login & Authentication.
- Activate the toggle below Two-Issue Authentication to allow the function.
- Scan the 2FA code together with your app of selection, together with Google Authenticator and Authy.
A novel code will likely be required each time you log in to Linode, so do not lose entry to the system that has your authenticator app. In any other case, you might need issue logging into your account. At all times make backups when doable.
handle your VPN
Congratulations, you now have your individual useful VPN server! For essentially the most half, you are all finished, however there are just a few remaining issues to think about.
For starters, you continue to want to put in the OpenVPN shopper in your different units, which permits them to entry your VPN server. And even when your server is rebooted (when Linode performs upkeep, for instance), the VPN will mechanically restart. You may even select so as to add or take away customized profiles to your server if wanted, however that is fully as much as you.
troubleshoot frequent issues
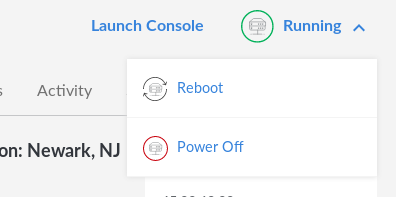
If one thing is not working, rebooting your server is likely to be the only repair that makes every thing higher.
- Go to your Linode dashboard, then click on the VPN server.
-
Click on the Working button within the upper-right nook, and choose Reboot. This command tells your server to carry out a system restart, permitting it to close down safely and begin again up in a recent new state.
add or take away VPN profiles
You have already got your first OpenVPN profile for your self, which is linked on to the .ovpn file. Nevertheless, you may create much more profiles to let different individuals entry your VPN do you have to want to take action. And for administrative functions, you at all times have the facility to take away a profile later if you wish to revoke somebody’s entry.
To get began, simply rerun the VPN setup script within the web-based terminal:
wget https://git.io/vpn -O openvpn-install.sh && bash openvpn-install.sh
You will see a sequence of choices. Sort the quantity for the one you need and press Enter. The script walks you thru the motion, so the setup course of needs to be simple.
delete your VPS
Should you resolve you do not need your individual VPN anymore, delete the server with only a few fast clicks. To get began with that, do the next:
- Go to your Linode Dashboard, then click on the VPN server.
- Choose the Settings tab on the prime.
- Press Delete Linode.
- Your server is totally eliminated and now not accessible by you or anybody else.
Internet hosting your individual VPN is not very troublesome as soon as you already know what to do
Should you do not need to depend on or belief third-party VPN suppliers, internet hosting your individual server is likely to be proper up your alley.
Doing so could make your life so much safer by placing you answerable for your knowledge, which ensures it stays safe. On the identical time, you will must be extra conscious of how a lot bandwidth you are utilizing most often.
As talked about earlier, internet hosting your individual VPN server is just not for everybody. Nonetheless, it makes for a enjoyable studying expertise. You’ll be able to at all times circle again round to the concept sooner or later.
In case you are excited about studying extra about VPNs, we’ve a information on what a VPN is and why you must use one in your smartphone.
We discuss how a VPN works, just a few trendy safety protocols, and a few key areas the place it could’t totally shield you on-line.
Don't Miss:
 How to Create and Use Your Own Cloud Based VPN Server
 State regulators call for consistent pet insurance rules
What Comes With a 2022 Jeep Renegade?
State regulators call for consistent pet insurance rules
What Comes With a 2022 Jeep Renegade?
 6 tips for beginners who want to start stand-up paddleboarding
Get Your Wrist Jewellery Right – 8 Easy Tips To Styling Bracelets
6 tips for beginners who want to start stand-up paddleboarding
Get Your Wrist Jewellery Right – 8 Easy Tips To Styling Bracelets
 Advice For Alpha Dogs
 A Student Learns the Value – and Joy – of Fostering an Orphaned Pet
 Next-Gen 2024 Subaru Forester Will Have A New Green Light Notification